A practical deep-dive into transmission line fault classification using custom NumPy implementations and Support Vector Machines (Linear vs. RBF Kernels).
1. Introduction & The Engineering Challenge
In high-voltage electrical power grids, three-phase transmission lines are the critical arteries carrying bulk electrical power across vast distances. However, these lines operate exposed to severe environmental stressors and are vulnerable to various fault conditions:
- Line-to-Ground (L-G) Faults: Typically caused by lightning strikes, tree encroachment, or insulation flashover.
- Line-to-Line (L-L) Faults: Physical contact between phase conductors due to high winds, conductor galloping, or tower sway.
- Double Line-to-Ground (L-L-G) Faults: Multi-phase contact involving ground path.
- Three-Phase Symmetrical (L-L-L / L-L-L-G) Faults: Severe short-circuits across all phases simultaneously.
When a short-circuit occurs, instantaneous currents surge to destructive levels, while voltages sag sharply due to the collapse of line impedance. A numerical protective relay must detect this abnormal condition within milliseconds (typically 1–2 cycles of 50/60 Hz power frequency, or 20–40 ms) and send a trip signal to the circuit breaker before transformer cores saturate or conductors melt.
In this project, we address a foundational engineering and machine learning question:
"Can a linear decision boundary detect a fault from instantaneous 3-phase current and voltage measurements? If not, what is the simplest and most effective fix: expanding the feature space (e.g., quadratic features) or using non-linear kernels (e.g., RBF Support Vector Machines)?"
To rigorously understand the underlying mathematical mechanics, we implement Logistic Regression completely from scratch using NumPy (avoiding high-level abstractions like Scikit-Learn's estimators, scalers, or train-test split utilities) and benchmark it directly against Linear and Radial Basis Function (RBF) Support Vector Machines (SVMs).
2. Dataset and Preprocessing Pipeline
We utilized the Electrical Fault Detection and Classification benchmark dataset from Kaggle, simulated in MATLAB/Simulink. Each observation represents an instantaneous measurement sample containing 6 physical quantities:
Ia, Ib, Ic: Instantaneous currents of phases A, B, and C (Amperes).Va, Vb, Vc: Instantaneous voltages of phases A, B, and C (per-unit system).y ∈ {0, 1}: Binary ground-truth target where1denotes a fault condition and0denotes normal healthy operation.
Data Cleaning and Leak-Free Standardisation:
- Uninformative Column Removal: The raw CSV dataset contained two empty trailing columns (
Unnamed: 7andUnnamed: 8), which were dropped. - Deterministic Partitioning: The cleaned dataset (12,001 rows) was split into 60% Training (7,200 rows), 20% Validation (2,400 rows), and 20% Test (2,401 rows) using a fixed random seed (
np.random.default_rng(42)). The fault class proportion remained balanced across all splits (~45.1% – 46.1% faults). - Strict Standardisation: To prevent data leakage, the mean μ and standard deviation σ were computed solely from the training partition and then applied to transform the validation and test partitions:
z = (x - μtrain) / σtrain
Feature Sets Defined:
- Set R (Raw Features, d=6):
[Ia, Ib, Ic, Va, Vb, Vc] - Set Q (Quadratic Features, d=12):
[Ia, Ib, Ic, Va, Vb, Vc, Ia2, Ib2, Ic2, Va2, Vb2, Vc2]
Crucial engineering detail: For Set Q, the squared features were computed from the raw physical values before computing the 12-dimensional training mean and standard deviation for standardisation.
| Property / Metric | Value |
|---|---|
| Raw rows / raw columns | 12,001 rows / 9 columns |
| Columns removed | Unnamed: 7, Unnamed: 8 |
| Missing values after cleaning | 0 |
| Fault rows / Healthy rows | 5,496 fault (45.8%) / 6,505 healthy (54.2%) |
| Train / Validation / Test rows | 7,200 / 2,400 / 2,401 |
| Fault fraction in Train / Val / Test | 0.4607 / 0.4512 / 0.4565 |
3. Exploratory Data Analysis: Why Linear Classifiers Fail
Before training any machine learning model, exploratory data analysis reveals the fundamental physical geometry of power transmission signals.
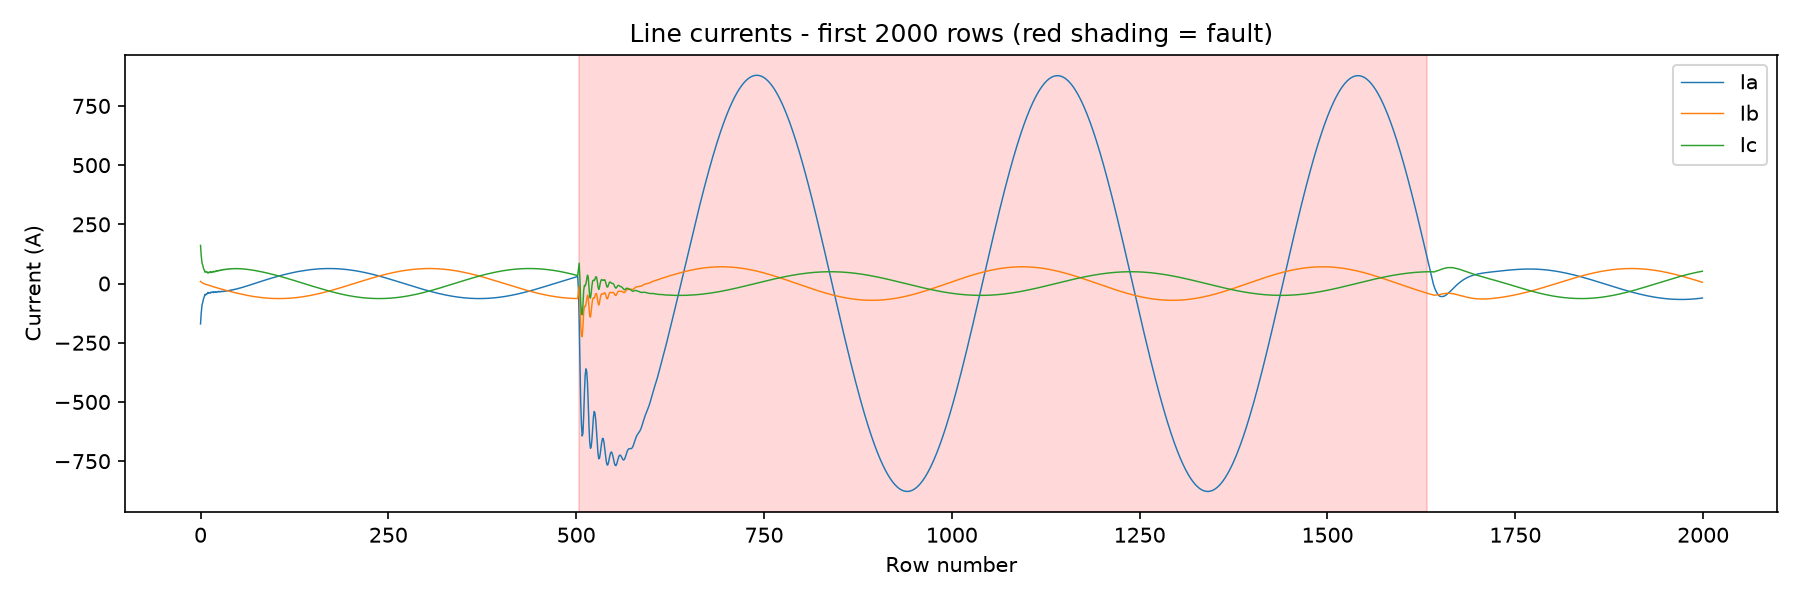
In normal healthy conditions, currents follow clean sinusoidal oscillations with bounded amplitudes. Once a fault strikes, the currents surge instantaneously by several orders of magnitude, accompanied by severe phase asymmetry and voltage collapse.
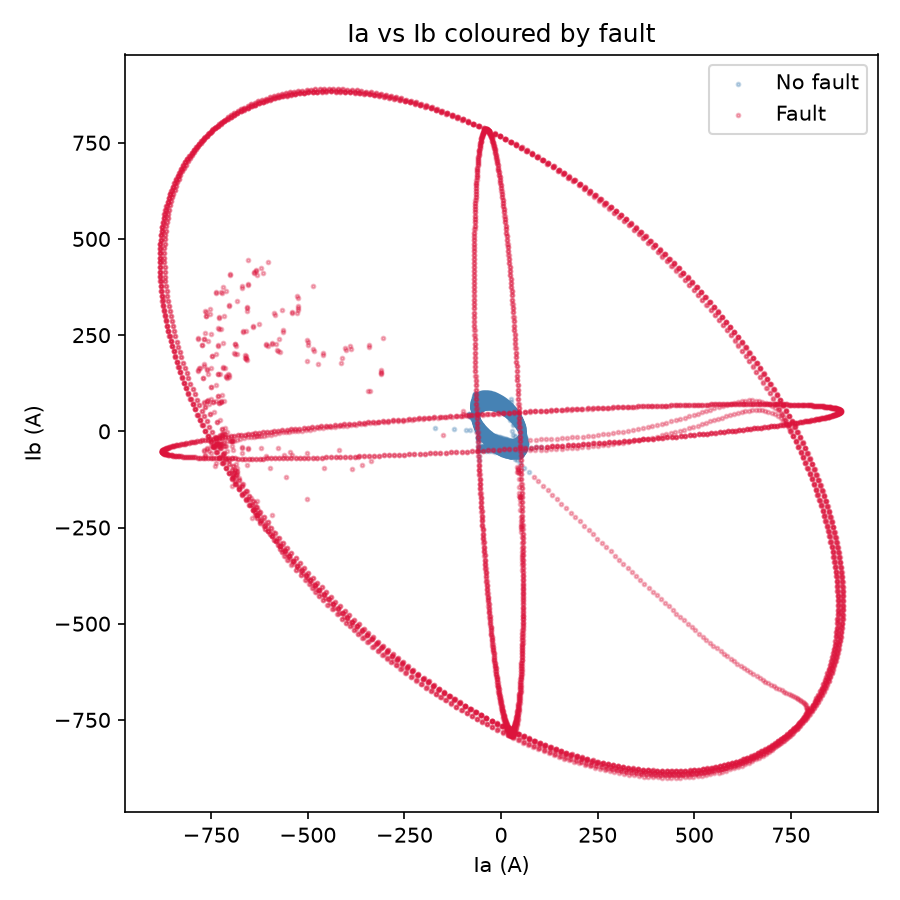
The Phase-Plane Geometry (Ia vs Ib):
- Normal operating points form a compact cluster centered at the origin (0, 0).
- Fault points form a broad annular ring (torus) completely encircling the normal operating cluster.
Why does a linear hyperplane fail? Because alternating currents oscillate symmetrically across zero every half cycle, instantaneous fault currents swing between positive peaks and negative troughs. Fault states surround the origin in all directions. A flat linear hyperplane cutting through the 6D feature space cannot isolate the interior healthy core from the exterior surrounding fault ring without triggering immense misclassifications.
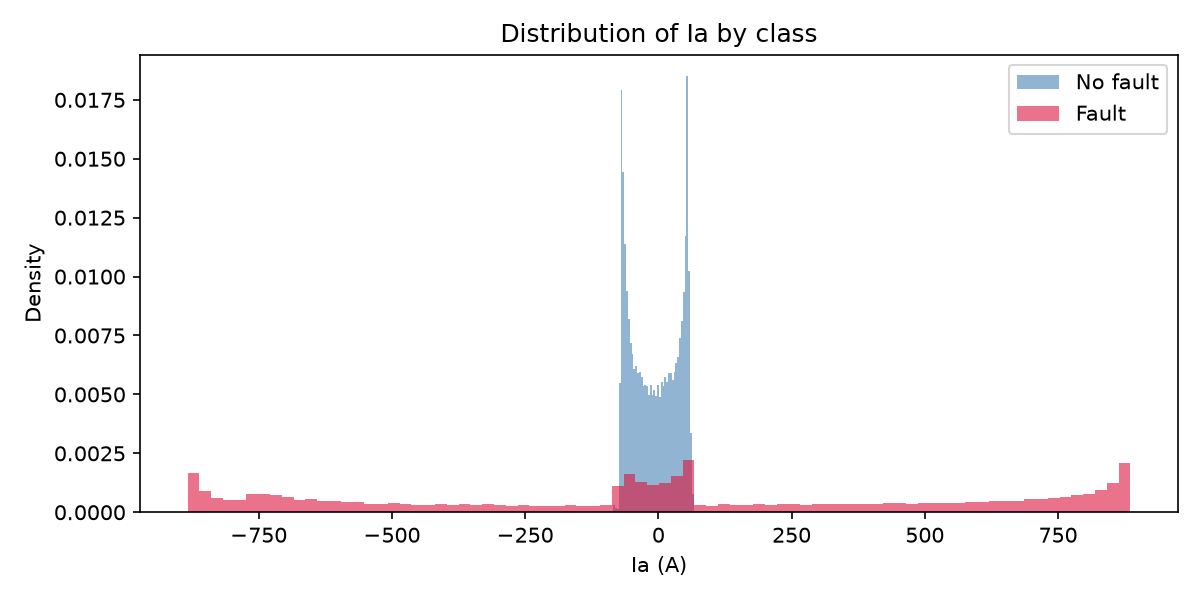
4. Model Implementation & Training
4.1 Logistic Regression from Scratch (NumPy)
The logistic regression model parameters θ ∈ ℝd+1 were trained using custom vectorized NumPy routines:
- Sigmoid Hypothesis:
hθ(x) = 1 / (1 + exp(-θT x)) - Negative Log-Likelihood Cost with Numerical Clipping: Probabilities were clipped to
[10-12, 1 - 10-12]to prevent ±∞ overflow during log evaluations. - Vectorized Gradient Descent: Parameters updated iteratively via
θ := θ + (α/m) XT (y - hθ(X)).
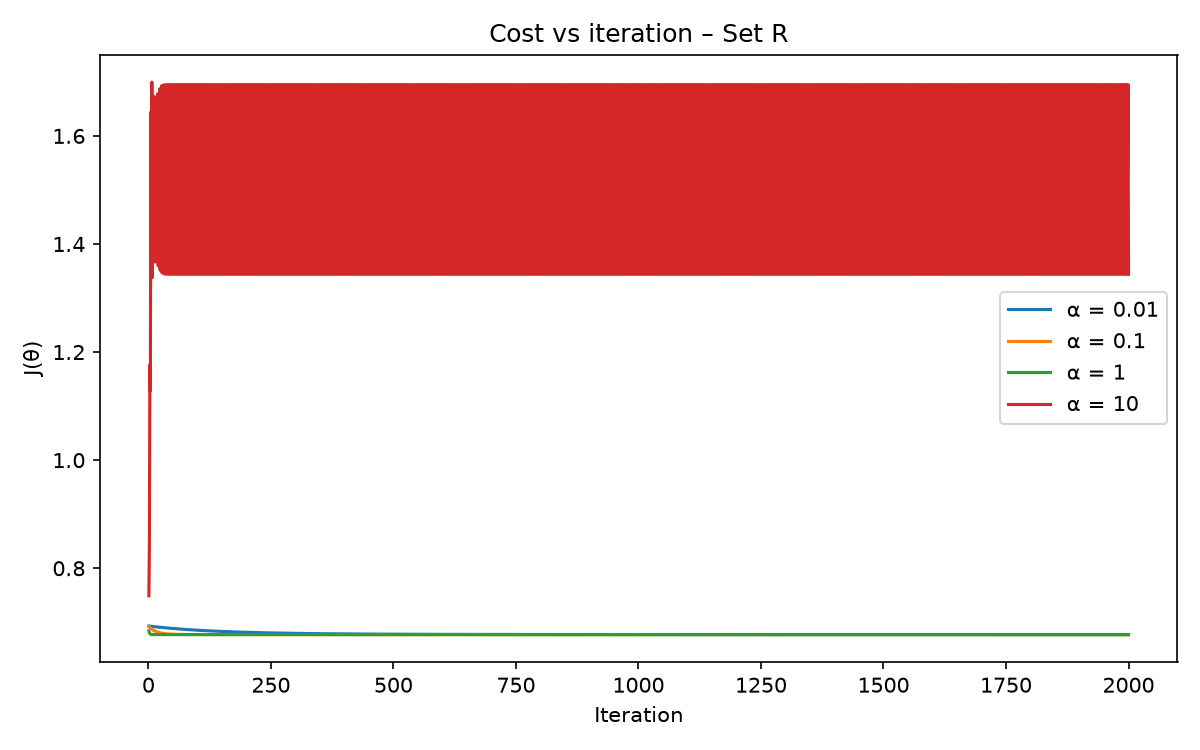
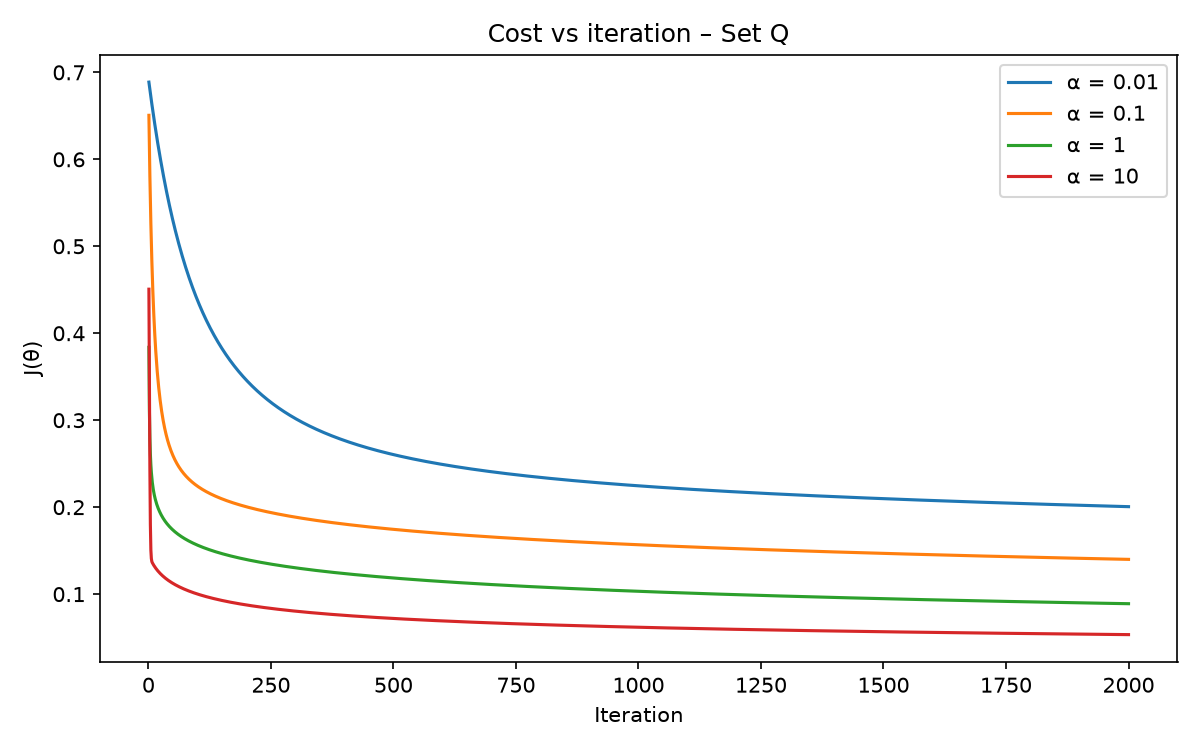
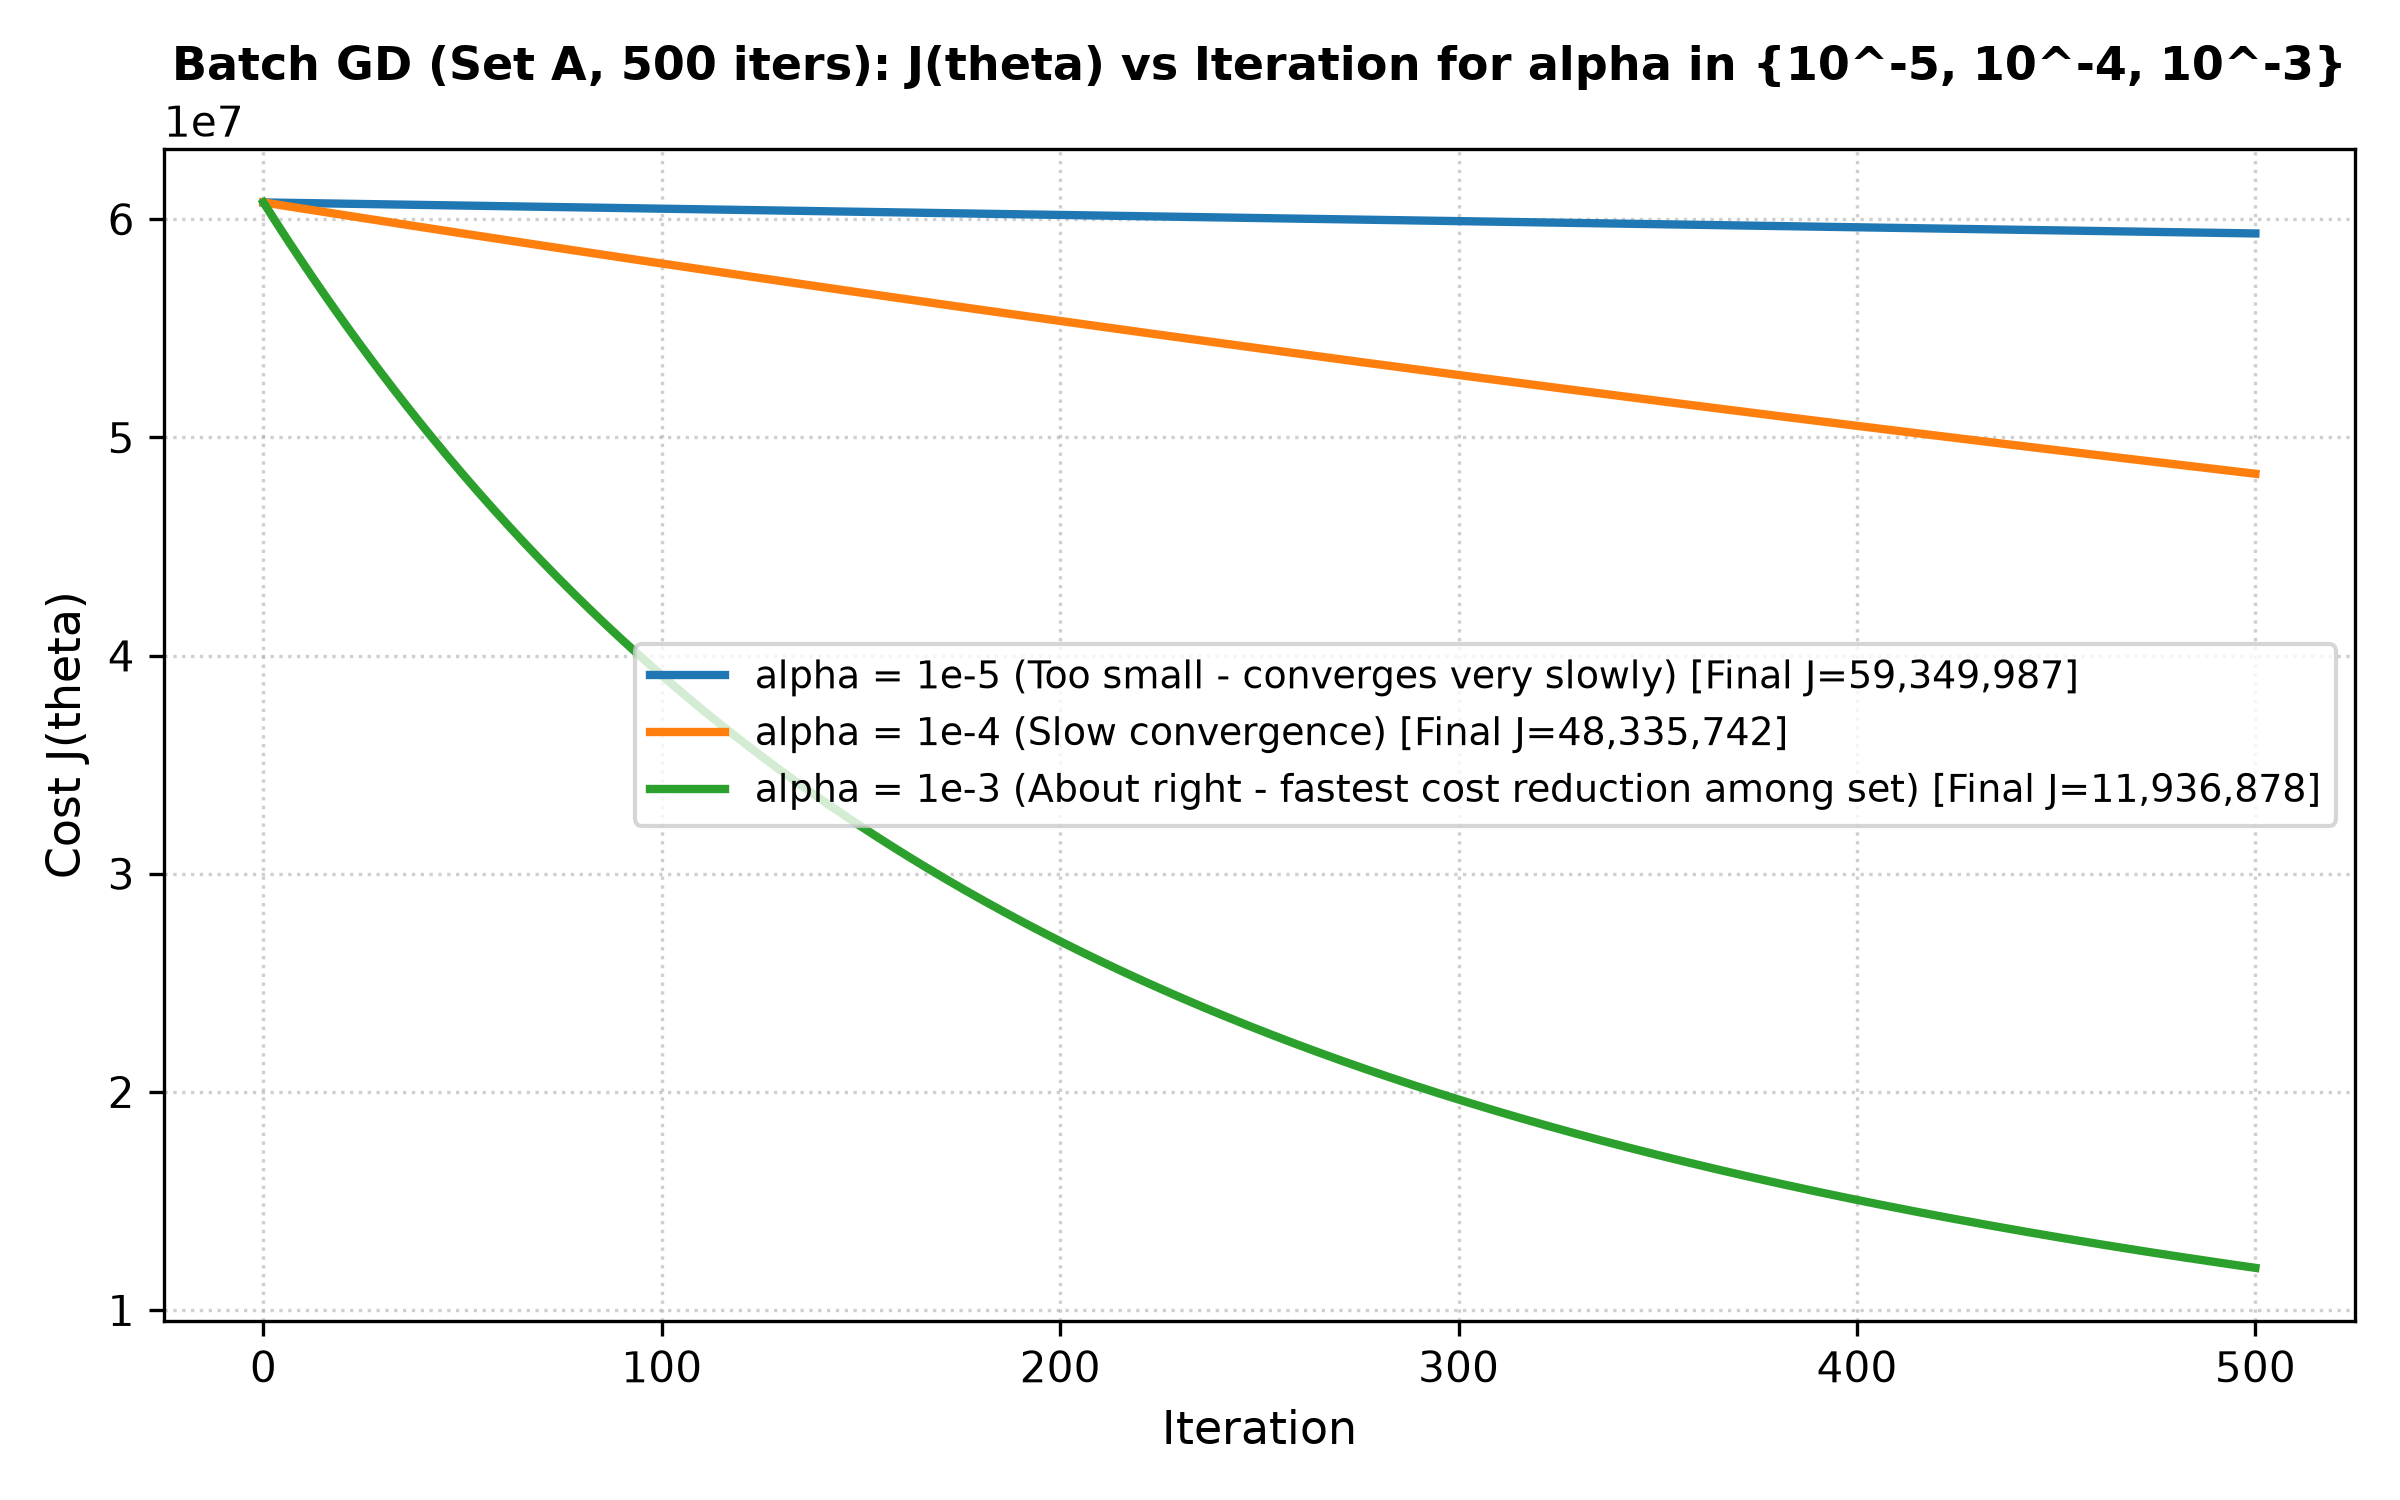
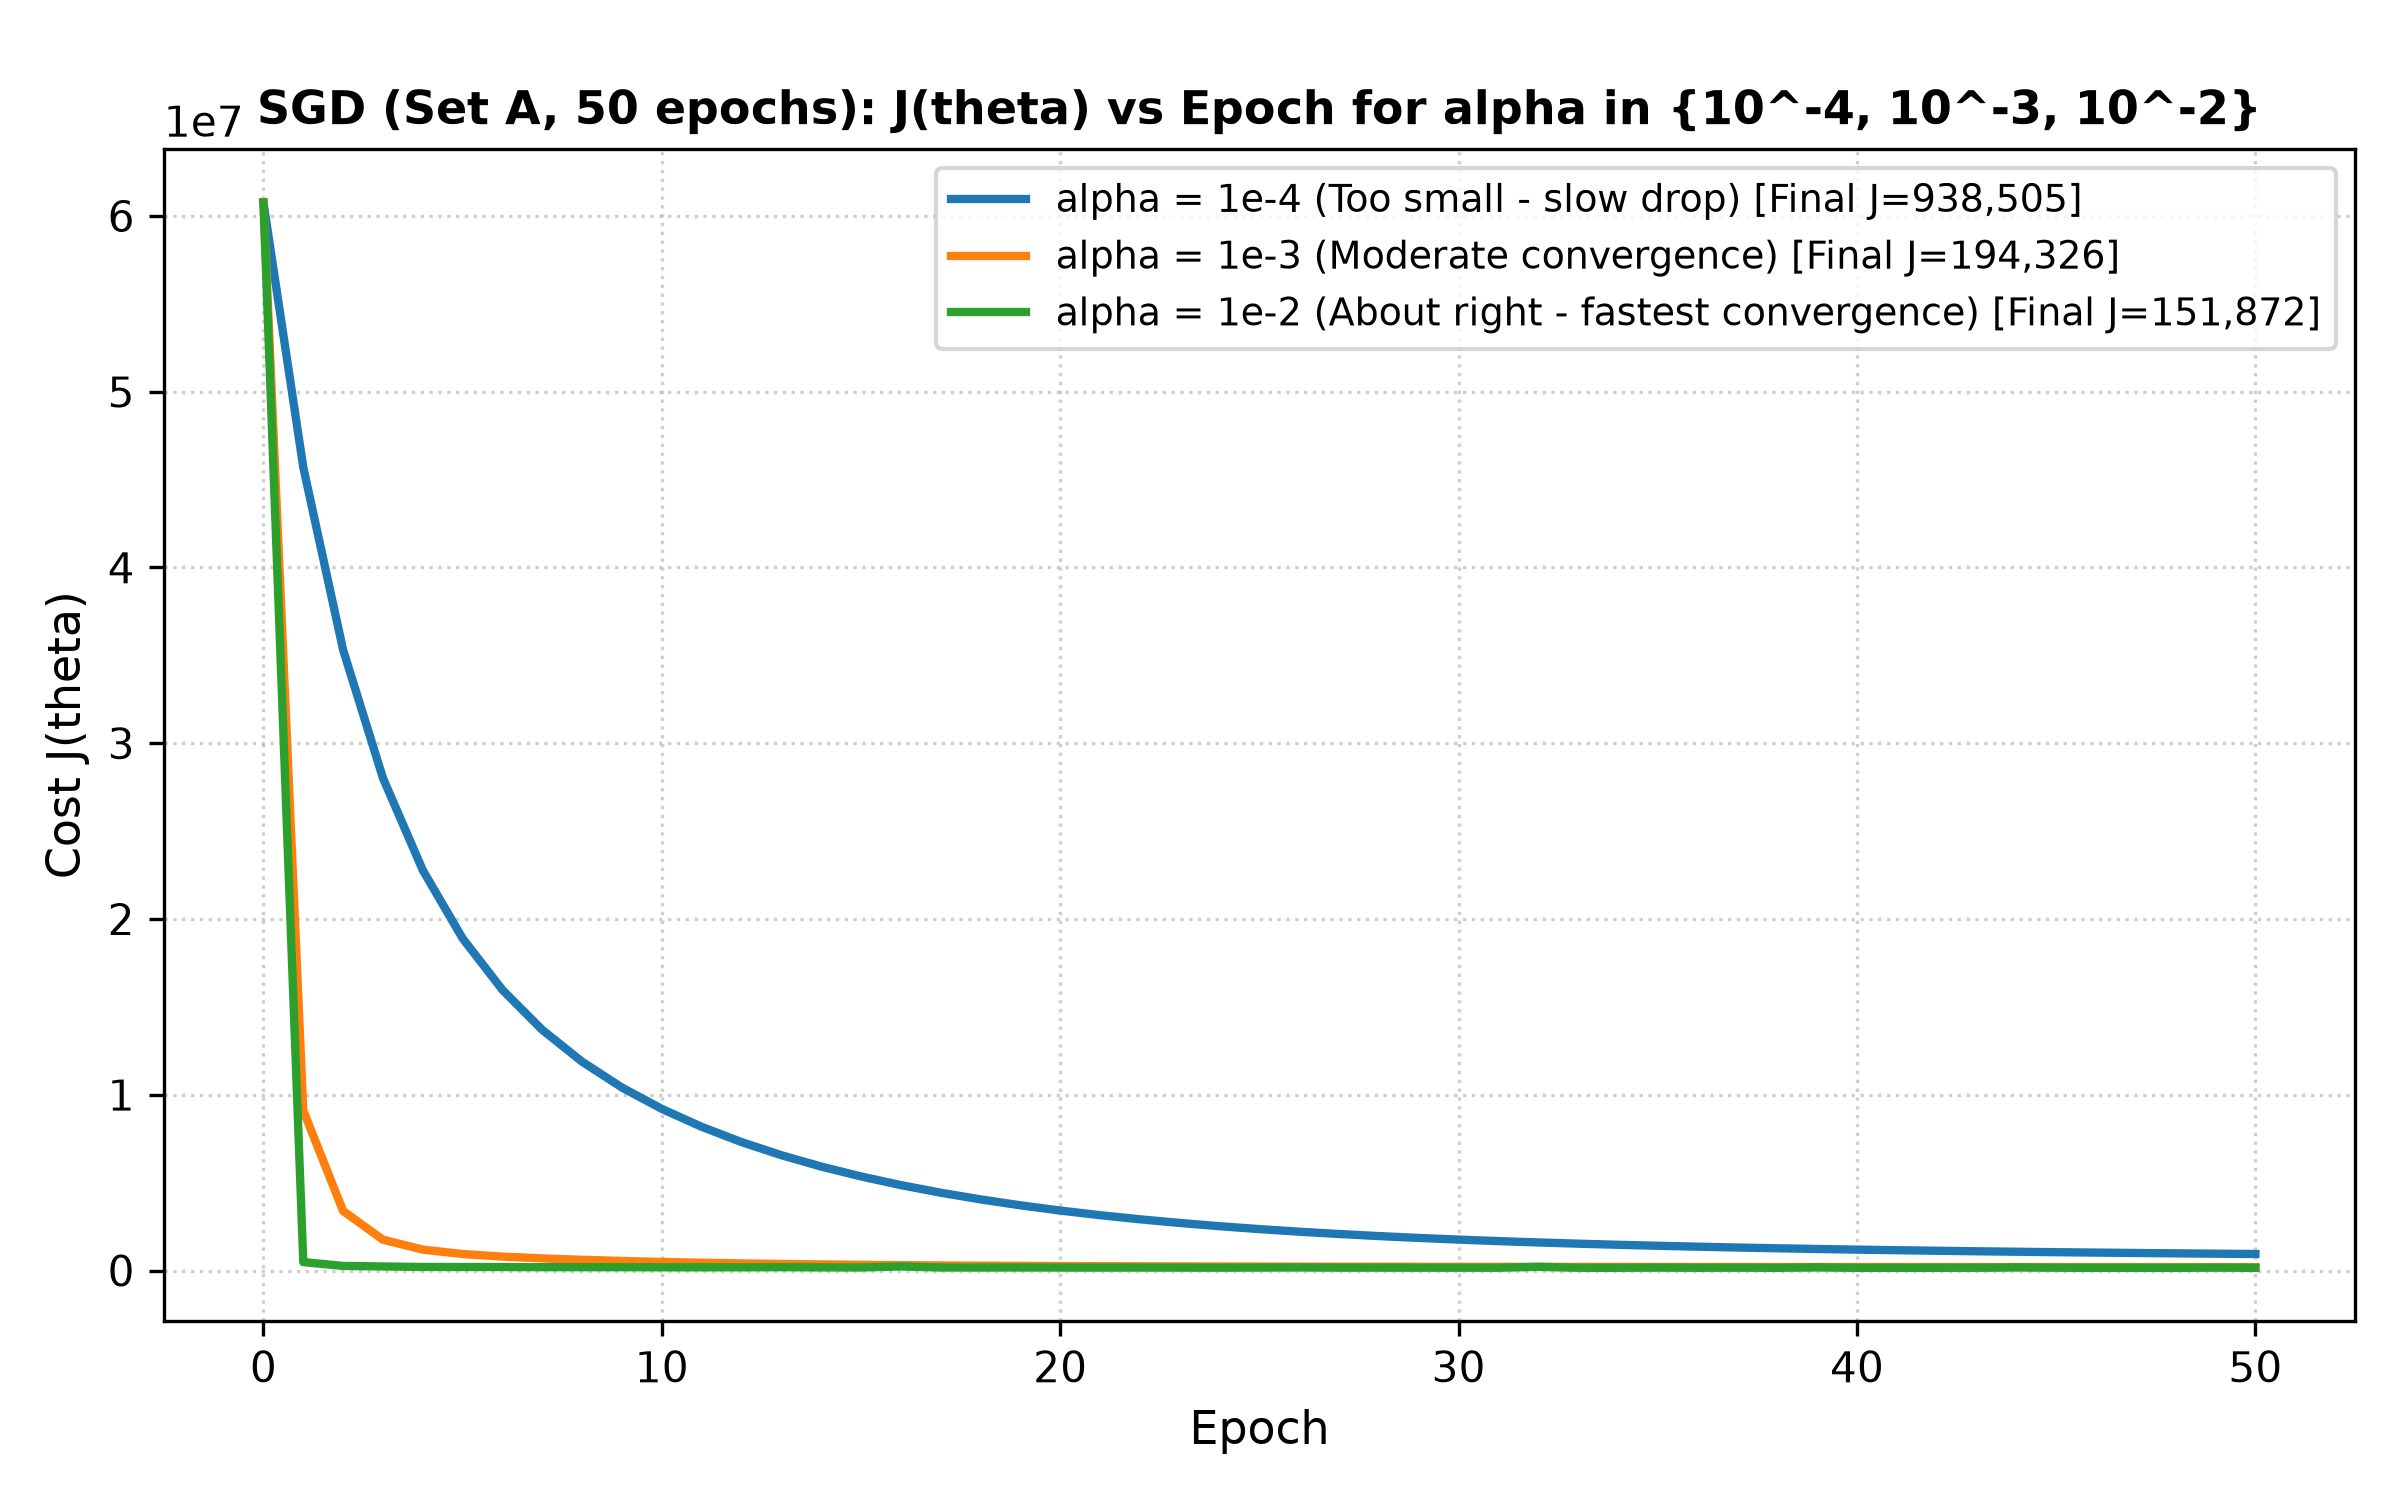
For both feature sets, cost curves strictly monotonically decreased with α = 1.0 (Set R) and α = 10.0 (Set Q), converging cleanly from the theoretical initial cost J(0) = ln(2) ≈ 0.693147.
| Feature Set | Chosen Learning Rate (α) | Final Cost J(θ) | Validation Accuracy |
|---|---|---|---|
| Set R (Raw, d=6) | α = 1.0 | 0.677161 | 73.08% |
| Set Q (Quadratic, d=12) | α = 10.0 | 0.053434 | 97.83% |
4.2 Support Vector Machines (Linear vs. RBF Kernels)
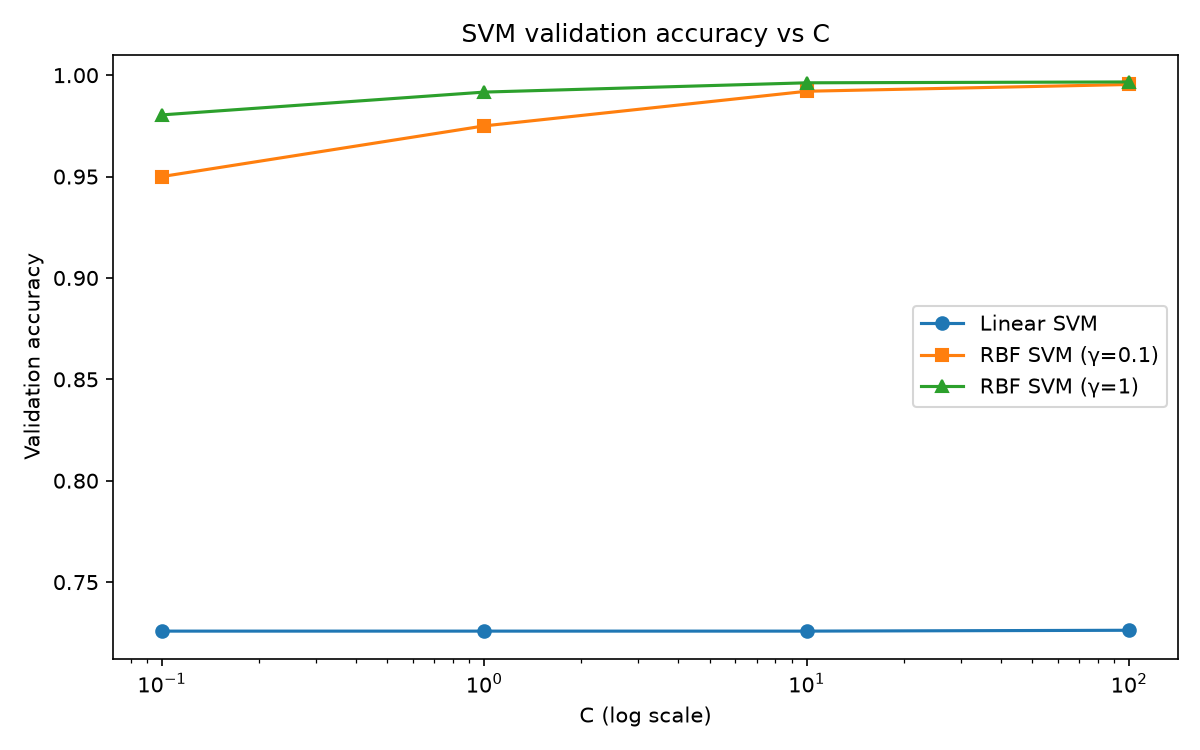
We trained Support Vector Classifiers on Set R across regularisation parameter C ∈ {0.1, 1.0, 10.0, 100.0} and kernel coefficients γ ∈ {0.1, 1.0}:
| Kernel | C | γ | Validation Accuracy | Support Vectors |
|---|---|---|---|---|
| Linear | 0.1 | - | 72.58% | 5,849 / 7,200 |
| Linear | 1.0 | - | 72.58% | 5,843 / 7,200 |
| Linear | 10.0 | - | 72.58% | 5,835 / 7,200 |
| Linear | 100.0 | - | 72.62% | 5,835 / 7,200 |
| RBF | 0.1 | 0.1 | 95.00% | 1,347 / 7,200 |
| RBF | 0.1 | 1.0 | 98.04% | 848 / 7,200 |
| RBF | 1.0 | 0.1 | 97.50% | 723 / 7,200 |
| RBF | 1.0 | 1.0 | 99.17% | 482 / 7,200 |
| RBF | 10.0 | 0.1 | 99.21% | 381 / 7,200 |
| RBF | 10.0 | 1.0 | 99.62% | 342 / 7,200 |
| RBF | 100.0 | 0.1 | 99.54% | 174 / 7,200 |
| RBF | 100.0 | 1.0 | 99.67% | 266 / 7,200 |
5. Unbiased Test Set Performance Evaluation
Evaluating the four selected final candidate models exactly once on the held-out test partition (2,401 rows):
| Model Architecture | Test Accuracy | True Negatives (TN) | False Alarms (FP) | Missed Faults (FN) | True Positives (TP) |
|---|---|---|---|---|---|
| Logistic Regression (Set R) | 72.64% | 1,305 | 0 | 657 | 439 |
| Linear SVM (C=100) | 73.64% | 1,305 | 0 | 633 | 463 |
| Logistic Regression (Set Q) | 97.88% | 1,299 | 6 | 45 | 1,051 |
| RBF SVM (C=100, γ=1.0) | 99.58% | 1,301 | 4 | 6 | 1,090 |
6. Deep Analytical Insights
6.1 Physical Meaning of the Learned Quadratic Weights (θ)
Inspecting the learned parameter vector θ for Set Q reveals how machine learning captures real-world electrical circuit physics:
| Weight Index | Feature | Learned Value | Physical Interpretation |
|---|---|---|---|
| θ0 | Bias / Intercept | +24.9209 | Baseline log-odds offset |
| θ1 | Ia | +2.3273 | Linear phase current correlation |
| θ2 | Ib | -5.3581 | Phase balance offset |
| θ3 | Ic | -1.7365 | Phase balance offset |
| θ4 | Va | -0.5336 | Voltage coupling |
| θ5 | Vb | +0.4167 | Voltage coupling |
| θ6 | Vc | +0.0986 | Voltage coupling |
| θ7 | Ia2 | +18.8912 | High Energy / Overcurrent Surge (+) |
| θ8 | Ib2 | +4.7543 | High Energy / Overcurrent Surge (+) |
| θ9 | Ic2 | +13.9569 | High Energy / Overcurrent Surge (+) |
| θ10 | Va2 | -6.0276 | Healthy Voltage Indicator (−) |
| θ11 | Vb2 | -6.4643 | Healthy Voltage Indicator (−) |
| θ12 | Vc2 | -6.1407 | Healthy Voltage Indicator (−) |
Notice that the weights on the squared currents (Ia2, Ib2, Ic2) are massively positive (±18.89, ±13.96), pushing the sigmoid probability towards 1 (Fault). Conversely, the weights on the squared voltages (Va2, Vb2, Vc2) are consistently negative (-6.03 to -6.46), pushing the probability towards 0 (Healthy).
When a line faults, currents soar (short-circuit) and voltages collapse (impedance drops). The quadratic terms measure the instantaneous electrical energy magnitude E ∝ I2, transforming the doughnut-shaped annular ring into a cleanly separable elliptic paraboloid!
6.2 Support Vector Dynamics: Linear vs RBF
The Linear SVM required 5,835 support vectors out of 7,200 training rows (81.0%)! This enormous support vector count confirms that points are constantly violating the margins and that linear separation is fundamentally impossible.
In contrast, the RBF SVM with C=100 and γ=1.0 achieved 99.6% accuracy with only 266 support vectors (3.7%). The kernel function implicitly projects the data into an infinite-dimensional Hilbert space where an optimal maximum-margin hyperplane separates the fault manifolds effortlessly.
6.3 Relay Engineering: Missed Faults vs False Alarms
In protective relaying, a missed fault (False Negative) is an operational disaster. If a fault is missed, fault current continues to arc through the transmission tower, destroying transformers, endangering human life, and destabilizing the grid. A false alarm (False Positive) is merely an inconvenience that causes an unnecessary breaker trip.
While linear models miss over 630 faults on the test set, the RBF SVM reduces missed faults to just 6 (and Set Q Logistic Regression reduces it to 45).
7. Full-Stack Interactive Web Dashboard
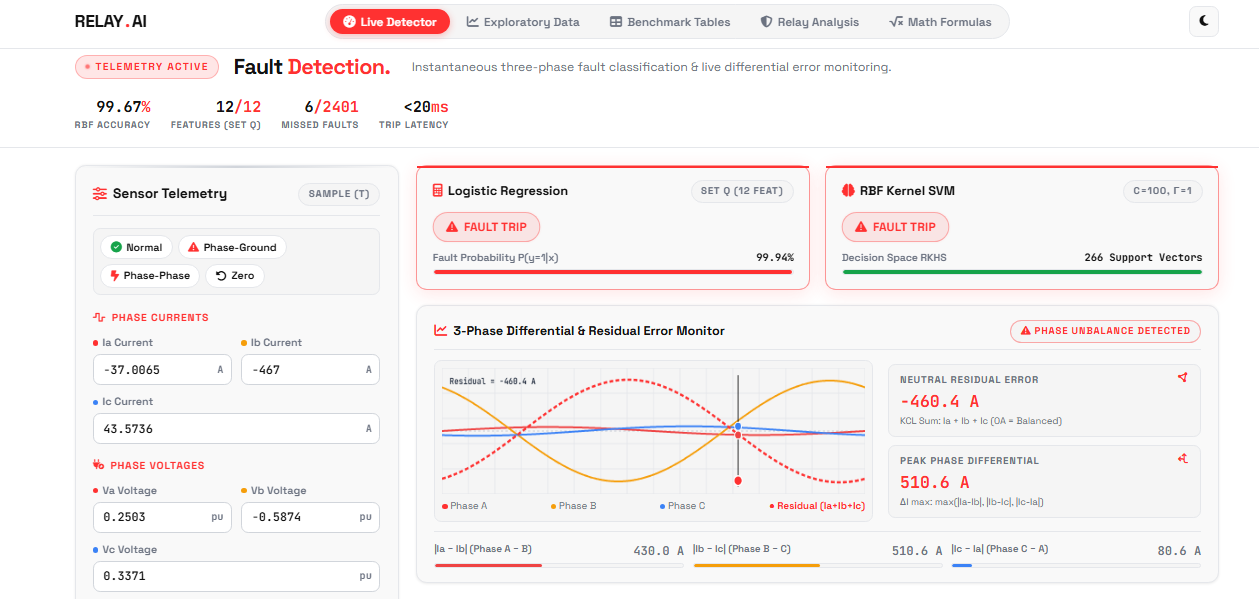
To make this system accessible to power systems operators and electrical engineers, we built an interactive dashboard with glassmorphism dark UI styling. It allows users to:
- Enter custom instantaneous 3-phase currents (
Ia, Ib, Ic) and voltages (Va, Vb, Vc). - Select predefined realistic fault presets (Healthy Baseline, Phase A-G Fault, Severe Three-Phase Symmetrical Short Circuit).
- Get instantaneous real-time inference with probability gauges comparing Quadratic Logistic Regression vs. RBF Support Vector Machine side-by-side.
8. Summary & Key Takeaways
- Geometry Dictates Model Choice: AC oscillatory signals create circular/annular geometric distributions in phase-space that linear models cannot separate (capped at ~73%).
- Physics-Informed Feature Engineering: Introducing quadratic features (
I2, V2) lifted simple logistic regression accuracy from 73.0% to 97.9% without adding complex model latency. - Non-Linear Kernels: RBF SVM achieved the highest test performance (99.58% accuracy with only 6 missed faults).
- Zero-Dependency Fundamentals: Writing logistic regression from scratch in pure NumPy provides profound insight into standardisation, numerical stability, and optimization dynamics.
Explore the Complete Source Code
Full Python source code, NumPy implementations, EDA notebooks, Streamlit app, and pretrained models are available on GitHub.
View GitHub Repository